Giving an watch app to your iOS app users is a good way of making your app’s goodwill strong, but making it robust is quite difficult for beginners, mainly sending data and keeping both the apps in sync is what you will be learning, so let’s get started.
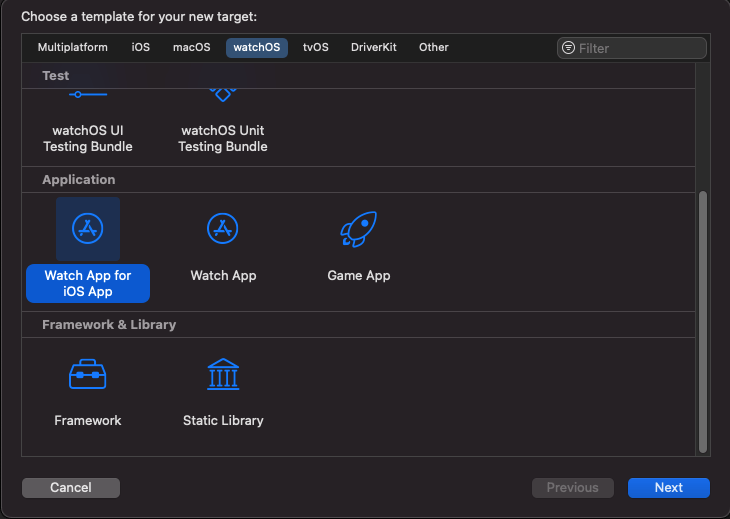
First, let’s add watch App to our app, go to ‘ File -> New -> Target.. ’ and then under watchOS select ‘Watch App for iOS App’ and this will add an watchApp to your project and an watchApp Extension.

So apple divides watch app into two section, the first section ‘WatchApp’s Assets’ ( and story board file if not using SwiftUI ) and an extension of your app that contains your app’s code, so mostly we will be working in the WatchKit Extension Group.
Transferring data between iOS app and watch app, we need to use WCSession.
Apple says
The object that initiates communication between a WatchKit extension and its companion iOS app.
WCSession provides us with some methods that we can use to transfer data to other end.
- Sending Messages
sendMessage(_:replyHandler:errorHandler:)Sends a message immediately to the paired and active device and optionally handles a responsesendMessageData(_:replyHandler:errorHandler:)Sends a data object immediately to the paired and active device and optionally handles a response.
Note
This method can only be called while the session is active.
Calling This method for an inactive or deactivated session is a programmer error.
- Managing Background Updates
updateApplicationContext(_:)Sends a dictionary of values that a paired and active device can use to synchronise its state.This method replaces the previous dictionary that was set, so you should use this method to communicate state changes or to deliver data that is updated frequently anyway.
- Transferring Data/Files in the Background
transferUserInfo(_:)Call this method when you want to send a dictionary of data to the counterpart and ensure that it’s delivered. Dictionaries sent using this method are queued on the other device and delivered in the order in which they were sent. After a transfer begins, the transfer operation continues even if the app is suspended.transferFile(_:metadata:)Sends the specified file and optional dictionary to the counterpart.
Note
Always test Watch Connectivity file transfers on paired devices. The Simulator app doesn’t support this methods.
For testing in simulator we will be using sendMessage(_:replyHandler:errorHandler:), but code is also given for transferUserInfo(_:) which is advisable with real device.
We will create two singleton class for handling our connection with other device, one we will name ‘WatchConnector’ and other ‘PhoneConnector’, for conforming to WCSessionDelegate protocol we have to first inherit from NSObject.
‘PhoneConnector’ will be used in WatchKit extension and ‘WatchConnector’ will be used in our iOS app, so make sure your target membership is correct.
class WatchConnector:NSObject {

    static let shared = WatchConnector()

    public let session = WCSession.default

    private override init(){
        super.init()
        if WCSession.isSupported() {
            session.delegate = self
            session.activate()
        }
    }
}
class PhoneConnector:NSObject {

    static let shared = PhoneConnector()

    public let session = WCSession.default

    private override init() {
        super.init()
        if WCSession.isSupported() {
            session.delegate = self
            session.activate()
        }
    }
}
Conform to WCSessionDelegate in an extension and add required methods and session method for sending data to counterpart
extension WatchConnector:WCSessionDelegate {

    func sessionDidBecomeInactive(_ session: WCSession) {
        session.activate()
    }

    func sessionDidDeactivate(_ session: WCSession) {
        session.activate()
    }

    func session(_ session: WCSession, activationDidCompleteWith activationState: WCSessionActivationState, error: Error?) {
        if let error = error {
            print("session activation failed with error: \(error.localizedDescription)")
            return
        }
    }

    func session(_ session: WCSession, didReceiveUserInfo userInfo: [String : Any] = [:]) {
        dataReceivedFromWatch(userInfo)
    }

    // MARK: use this for testing in simulator
    func session(_ session: WCSession, didReceiveMessage message: [String : Any]) {
        dataReceivedFromWatch(message)
    }

}
extension PhoneConnector:WCSessionDelegate {

    func session(_ session: WCSession, activationDidCompleteWith activationState: WCSessionActivationState, error: Error?) {
        if let error = error {
            print("session activation failed with error: \(error.localizedDescription)")
            return
        }
    }

    func session(_ session: WCSession, didReceiveUserInfo userInfo: [String : Any] = [:]) {
        dataReceivedFromPhone(userInfo)
    }

    // MARK: use this for testing in simulator
    func session(_ session: WCSession, didReceiveMessage message: [String : Any]) {
        dataReceivedFromPhone(message)
    }

}
Sending and receiving data in both the methods ( sendMessage and transferUserInfo) is done with an array of key/value pair, where key is of type String and value is of type Any, we will create common method for receiving data so that same code can be used for both, simulator and a real device.
The code for those methods is shown below, I will show and explain it in next section, what is ‘User’ and how we are sending and receiving it on their counterparts.
// MARK: - send data to watch
extension WatchConnector {

    public func sendDataToWatch(_ user:User) {
        let dict:[String:Any] = ["data":user.encodeIt()]

        //session.transferUserInfo(dict)
        // for testing in simulator we use
        session.sendMessage(dict, replyHandler: nil)
    }
}

// MARK: - receive data
extension WatchConnector {

    public func dataReceivedFromWatch(_ info:[String:Any]) {
        let data:Data = info["data"] as! Data
        let user = User.decodeIt(data)
        DispatchQueue.main.async {
            self.users.append(user)
        }
    }
}
// MARK: - send data to phone
extension PhoneConnector {

    public func sendDataToPhone(_ user:User) {
        let dict:[String:Any] = ["data":user.encodeIt()]

        //session.transferUserInfo(dict)
        // for testing in simulator we use
        session.sendMessage(dict, replyHandler: nil)
    }
}

// MARK: - receive data
extension PhoneConnector {

    public func dataReceivedFromPhone(_ info:[String:Any]) {
        let data:Data = info["data"] as! Data
        let user = User.decodeIt(data)
        DispatchQueue.main.async {
            self.users.append(user)
        }
    }
}
So, finally the fun part, how we will send our own custom object type to counter app, if you try sending it directly it will give you error, so most of the people they prefer converting their object type to dictionary and then back to object, but we are not going to do that because ‘it is not simply possible for every situation’ so instead what we will do is convert our object to Data type and conversation it back to our object.
To convert our object to type Data, we just need to conform to Codable protocol and then with the help of PropertyListEncoder we will be able to convert it easily.
In our case we are sending a struct named ‘User’ which has two properties a ‘name’ and ‘eMail’,which conforms to codable protocol, and it has two methods one is ‘encodeIt()’ which converts our User to type Data and another is ‘decodeIt(_:)’ which is a static method that takes one parameter of type Data and returns a User.
struct User:Codable {

    let name:String
    let eMail:String

    func encodeIt() -> Data {
        let data = try! PropertyListEncoder.init().encode(self)
            return data
    }

    static func decodeIt(_ data:Data) -> User {
        let user = try! PropertyListDecoder.init().decode(User.self, from: data)
        return user
    }

}
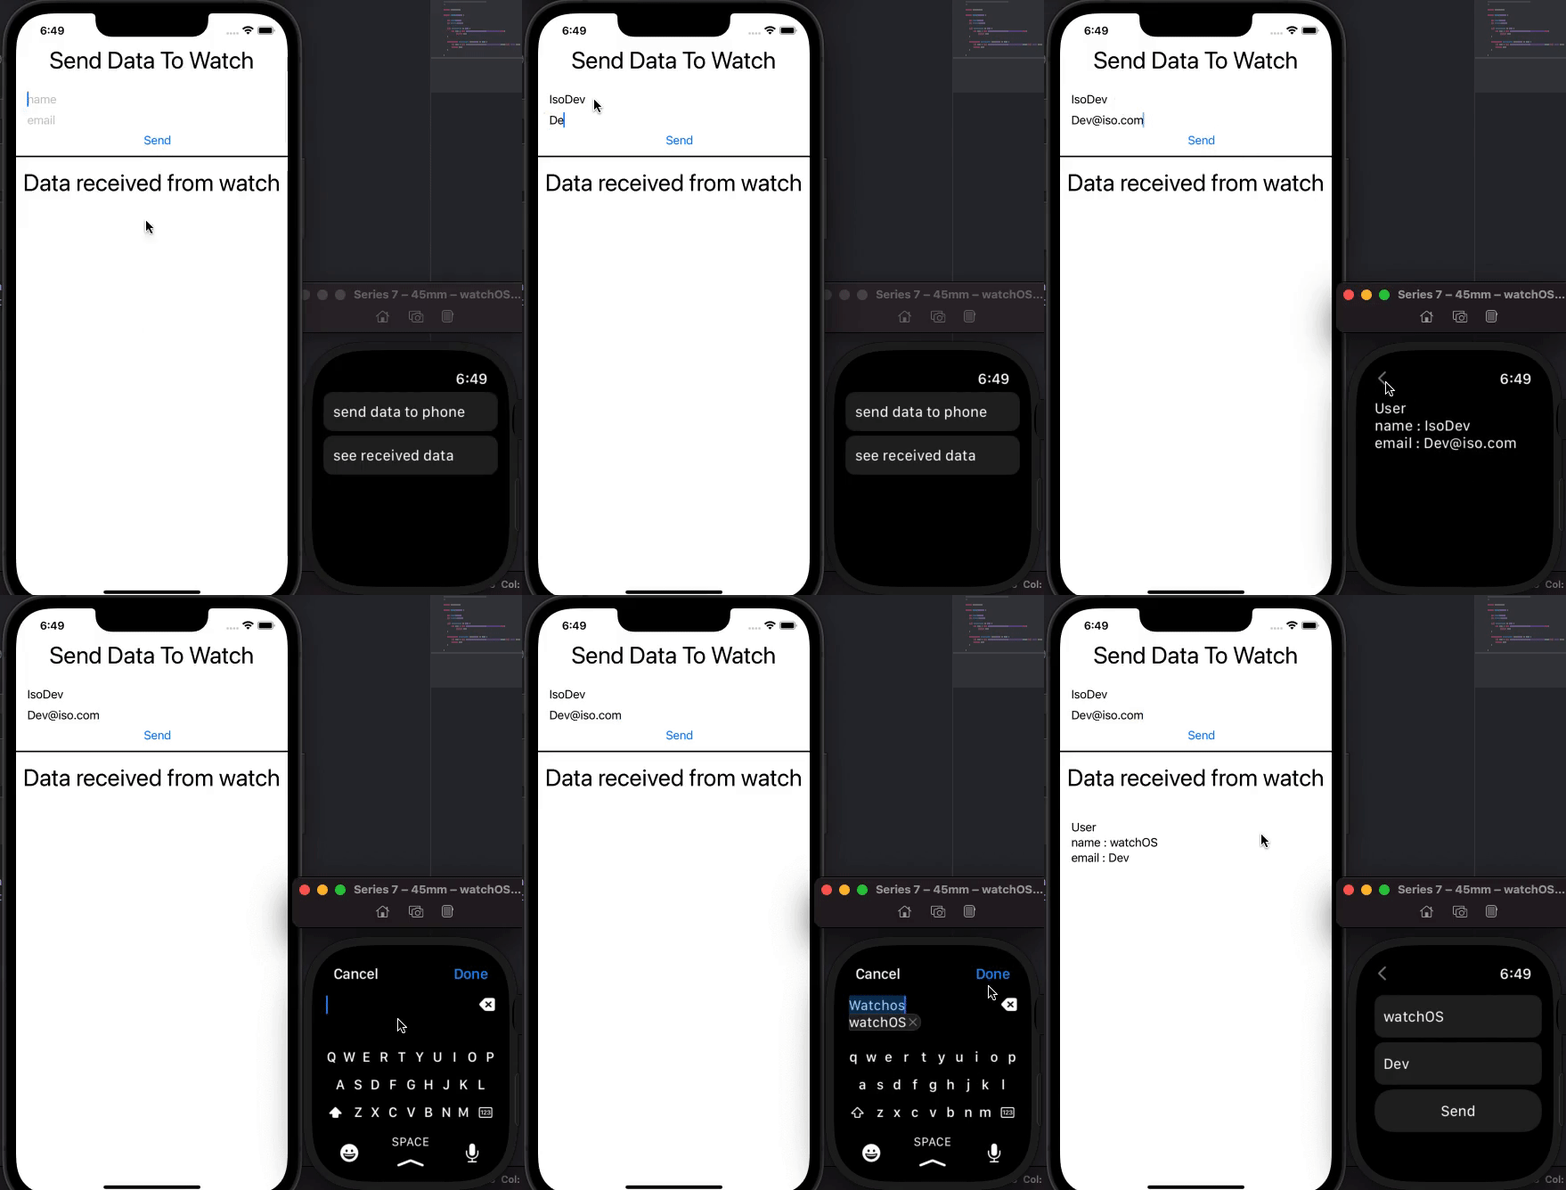
So now you can understand what we are doing in send and receive data methods, before sending a User to counterpart we are converting it to Data and and while receiving we convert it back to User, and the process it fast, clear and the results are also self evident as you can see below.

You can download the full source code of this demo project from Here
Happy coding to all, Thanks for reading.


