How to use viewBinding In Activities, Fragments, Adapters and Dialogs
Till now when we want to connect an XML element to a java or kotlin file we always use findViewById.
It is a very long and error-prone process, as we have to define UI Element Types of every variable and for every UI Element, we have to do the process again and again. It is a lengthy, time taking, and error-prone process, so what can we do to overcome it?
Here comes viewBinding to rescue.
What is viewBinding and How to use it?
viewBindingis a feature that allows us to write code easily that interacts with the view.viewBindingwill generate the binding class for each XML layout present in that module.- note that view binding is also a part of android jetpack.
How to Enable viewBinding? 🤔🤔
in module level build.gradle file in android tag paste below code :
buildFeatures {
    viewBinding=true
}
it will look like this :
android {
    ...
    buildFeatures {
        viewBinding = true
    }
}
than press on Sync now :

or press the below icon in top right corner :
Now we are ready to go, viewBinding is enabled in our project hurrah! 🥳🥳
Examples of How to use viewBinding in Code?
- viewBinding in Activity
- viewBinding in Fragments
- viewBinding in RecyclerView Adapters
- viewBinding in Custom Dialogs
Let’s Start with Activity First
class MainActivity : AppCompatActivity() {
    lateinit var binding: ActivityMainBinding
    override fun onCreate(savedInstanceState: Bundle?) {
        super.onCreate(savedInstanceState)
        binding = ActivityMainBinding.inflate(layoutInflater)
        setContentView(binding.root)
    }
}
In viewBinding Binding keyword will be post fixed after your layout name
So if layout name is activity_main binding class name will be ActivityMainBinding
After declaring variable inflate the binding layout and set root view in setContentView method
Now we will set the text of editText into textView on button click using binding
binding.button.setOnClickListener {
binding.textView.text=binding.editText.text.toString()
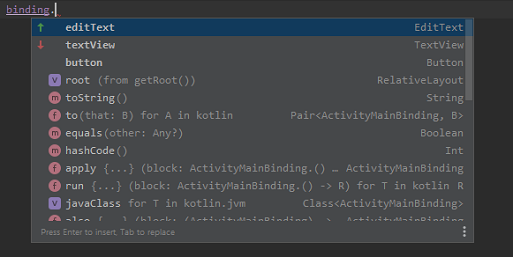
}See how easy it is to do, no variable declaration no extra code just with the binding variable we can access all components of the layout file.
What if we don’t want to write binding every time? Here is the kotlin solution.
Just write binding.run {} and you can access all components in the code block of run without binding variable
binding.run {
    button.setOnClickListener {
        textView.text=editText.text.toString()
    }
}
One thing to notice here when we use underscore ("_") in id or layout name, binding will automatically convert first letter in caps after underscore.
for example, here we gave edit_text id to our EditText
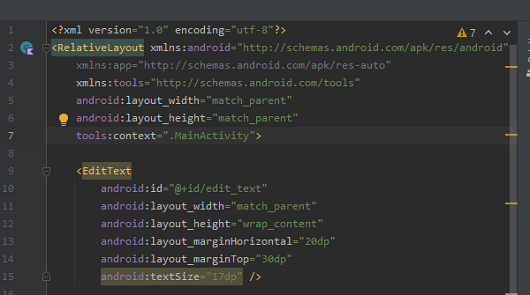
but when we want to access this EditText with binding, the name will be editText and not edit_text
Here is your full MainActivity code
class MainActivity : AppCompatActivity() {
    lateinit var binding: ActivityMainBinding
    override fun onCreate(savedInstanceState: Bundle?) {
        super.onCreate(savedInstanceState)
        binding= ActivityMainBinding.inflate(layoutInflater)
        setContentView(binding.root)
        binding.button.setOnClickListener {
            binding.textView.text=binding.editText.text.toString()
        }
        // if you don't want to write binding every time
        binding.run {
            button.setOnClickListener {
                textView.text=editText.text.toString()
            }
        }

    }
}
viewBinding in Fragments
In fragment first the binding variable will be assign with null because we have to clear the viewBinding before fragment get destroyed
private var _binding: FragmentBlankBinding? = null
The reason for clearing the binding is to avoid memory leaks, because a fragment instance might be reused by the framework after it is destroyed.
To avoid null check for every binding object we use backing property of kotlin to make another copy of binding.
private val binding get() = _binding!!
and also don’t forget to null the binding in onDestroyView() method
override fun onDestroyView() {
        super.onDestroyView()
        _binding = null
    }
then simply inflate layout
_binding = FragmentBlankBinding.inflate(inflater, container, false)
Now We can access Our UI Components with Binding Variables.
Here is Full Fragment Code
class BlankFragment : Fragment() {
    private var _binding: FragmentBlankBinding? = null
    private val binding get() = _binding!!
    override fun onCreateView(
        inflater: LayoutInflater, container: ViewGroup?,
        savedInstanceState: Bundle?
    ): View {
        _binding = FragmentBlankBinding.inflate(inflater, container, false)
        val view=binding.root

        // access your ui component with binding.yourControl
        return view
    }
    override fun onDestroyView() {
        super.onDestroyView()
        _binding = null
    }
}
viewBinding in RecyclerView Adapters
So first of all we will inflate our layout file in onCreateViewHolder method
override fun onCreateViewHolder(parent: ViewGroup, viewType: Int): UserViewHolder {
    val binding=UserListBinding.inflate(LayoutInflater.from(parent.context),parent,false)
    return UserViewHolder(binding)
}
now pass the binding class to ViewHolder class
In view holder class we don’t need to do anything just pass the view.root in Recycler.ViewHolder constructor
Class UserViewHolder(val view:UserListBinding):RecyclerView.ViewHolder(view.root)
Then in onBindViewHolder we can access all ui elements with holder.view variable
override fun onBindViewHolder(holder: UserViewHolder, position: Int) {
    holder.view.uId.text=userList[position].id.toString()
    holder.view.uName.text=userList[position].name
}
If you don’t want to write holder.view everytime you can simply use kotlin run method
holder.view.run {
    uId.text=userList[position].id.toString()
    uName.text=userList[position].name
}
So Here is the Full Adapter Code
class UserAdapter(private val userList:List):RecyclerView.Adapter() {
    override fun onCreateViewHolder(parent: ViewGroup, viewType: Int): UserViewHolder {
        val binding=UserListBinding.inflate(LayoutInflater.from(parent.context),parent,false)
        return UserViewHolder(binding)
    }
    override fun onBindViewHolder(holder: UserViewHolder, position: Int) {
        holder.view.uId.text=userList[position].id.toString()
        holder.view.uName.text=userList[position].name
	 // if you don't want to write holder.view every time
        holder.view.run {
            uId.text=userList[position].id.toString()
            uName.text=userList[position].name
        }
    }
    override fun getItemCount(): Int {
        return userList.size
    }
    class UserViewHolder(val view:UserListBinding):RecyclerView.ViewHolder(view.root)

}
viewBinding in Custom Dialogs
It is really simple and easy to use viewBinding in custom dialogs
Just inflate the layout file and set it in dialog.setContentView() method
val bind = CustomDialogBinding.inflate(layoutInflater)
dialog.setContentView(bind.root)
You can access all UI Components with bind variable.
bind.tvInfo.text="Write Your Address Here"
val address=bind.edAddress.text.toString()
Same like activities if you don’t want to write bind every time use kotlin run block.
bind.run {
    tvInfo.text="Write Your Address Here"
    val userAddress=bind.edAddress.text.toString()
}
So Here is the Full custom Dialog Code
val dialog = Dialog(this@MainActivity)
val bind = CustomDialogBinding.inflate(layoutInflater)
dialog.setContentView(bind.root)
bind.tvInfo.text="Write Your Address Here"
val address=bind.edAddress.text.toString()
// if you don't want to write bind every time
bind.run {
    tvInfo.text="Write Your Address Here"
    val userAddress=bind.edAddress.text.toString()
}
dialog.show()
I hope you learned something from this blog.